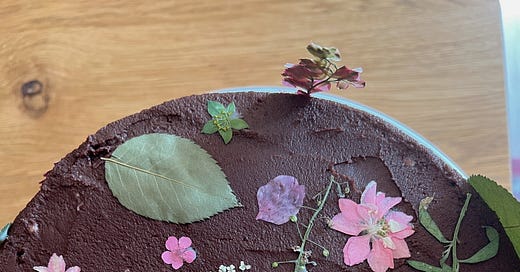
A Vintage Coca Cola Cake to Remember
Not from my Grandma's recipe box, but it should be. This old-school cake might just be the most tender chocolate layer cake I’ve ever made.
I’ve had this cake on my baking bucket list for a while. It’s not a recipe from my family, but it’s a vintage classic that kept calling to me and I was certain it came from one of your grandma’s recipe boxes. It is one of those curious, old-fashioned cakes tucked into church cookbooks. And I’m so glad I finally made it.
It reminds me of a Texas sheet cake, deeply chocolatey but not overly rich, subtly sweet, soft and tender all the way through. If you don’t like Coca Cola, don’t worry. You’re not drinking it; you’re baking with it. And what it does to the texture and flavor is pure magic without being overpowering.
This isn’t a showstopper because it’s complicated. It’s a showstopper because it’s nostalgic, comforting, and just so good. The kind of cake that disappears quickly from the table and has people asking for the recipe.
I tested and tweaked this one to work as a layered cake (because every celebration deserves= ones). I made it for my cousin’s baby shower. French-themed decor, vintage toile plates, and a nod to her love for Diet Coke. (Don’t use diet in the recipe, though! Trust me.)
Below is the full, detailed recipe with all the steps and tips I used to make it party-perfect. Save it, print it, share it, this one’s worth keeping.


LAYERED COCA COLA CAKE
Cake
1 cup regular Coca-Cola (not diet!)
½ cup buttermilk
1 cup salted butter, softened
1¾ cups granulated sugar
2 large eggs
1 tablespoon vanilla extract
2 cups all-purpose flour
½ cup unsweetened cocoa powder
1 teaspoon baking soda
1½ cups mini marshmallows
Frosting
¾ cup salted butter, room temperature
4 cups powdered sugar
½ cup unsweetened cocoa powder
Pinch of salt
1 teaspoon vanilla extract
¼ cup Coca-Cola
2–3 tablespoons milk or cream, as needed
Instructions
1. Prep your pans Preheat the oven to 350°F. Generously spray three 8-inch round cake pans with nonstick spray and line the bottoms with parchment paper. This cake is tender, so a good release is key. Set aside.
2. Warm your liquids In a small saucepan or microwave-safe bowl, gently heat the Coca-Cola and buttermilk together until just warm (not hot or boiling). Set aside to cool slightly. We are mostly concerned about them being room temperature. So I just let my coke and buttermilk sit out for 30 minutes before adding to the batter.
3. Make the batter In a large mixing bowl or stand mixer, cream the softened butter with sugar until light and fluffy, about 2–3 minutes. Add eggs one at a time, beating well after each addition. Mix in vanilla. Beat again for 3-4 minutes.
In a separate bowl, whisk together flour, cocoa powder, and baking soda. With the mixer on low, alternate adding the dry ingredients and the Coke-buttermilk mixture into the batter.
Fold in the mini marshmallows. They’ll melt during baking and give the cake its signature moist texture.
4. Bake Divide the batter evenly between the prepared pans. Bake for 25–27 minutes or until a toothpick inserted in the center comes out clean.
Let the cakes cool in the pans for 10 minutes, then carefully run a knife around the edges and invert onto a wire rack. The layers may look a little different than your typical cake, that’s the marshmallows working their magic.
5. Freeze (optional but highly recommended) For easier frosting and assembly, let the cake layers cool completely and then wrap tightly in plastic wrap. Freeze for at least 1 hour (or up to a few weeks).
6. Make the frosting In a large bowl, beat the butter until smooth and creamy. Add powdered sugar, cocoa powder, and salt. Beat until combined. Slowly add in Coke, vanilla, and milk/cream until your frosting is smooth, glossy, and spreadable.
7. Assemble Layer the frozen (or well-chilled) cakes with a generous swipe of frosting between each. Use the remaining frosting to cover the top and sides.
Notes + Tips
Pan prep is key: Don’t skimp on greasing and parchment lining. These layers are soft and delicate.
Marshmallows melt: Your layers may look a little different out of the oven — slightly bubbly or textured on top. Totally normal. Totally worth it.
Freeze your layers: A frozen cake is so much easier to frost. I love making the cake layers a few days or even weeks ahead, wrapping them well, and assembling the night before an event.
Decorating tip: To attach pressed edible flowers, I melted a bit of white chocolate and lightly brushed it on the back of each bloom. So easy and beautiful.
If you make this, tag me or comment below. I’d love to see your vintage twist on this nostalgic classic.
Xo,
Emi


